GUIDES
Horn of Africa Map: The 29-Nation Board, the Red Sea Chokepoint, and Where to Spawn
A decision framework for Horn of Africa, the v0.35 African board. What the 29-nation, 33-overflow-name, 2,024,462-land-tile board actually looks like, why the Red Sea and the Bab el-Mandeb corridor decide the match, how the land-driven lobby sizing rolls a 100-player lobby, and which side of the strait to commit to before the countdown ends.
Direct answer. Horn of Africa is a v0.35 land-heavy board with 29 spawn nations on 2,024,462 land tiles and a rotation frequency of 5, so under the new land-driven lobby sizing it rolls a 100-player large lobby (75 medium, 50 small) in FFA, matching the Vancouver Island land tier. The whole match is decided by the Red Sea: the sea is the main supply and trade axis, and the Bab el-Mandeb corridor at its southern end is the single chokepoint that links the Arabian-side land with the African-side land. Commit to one named anchor nation on the side you intend to hold, take its two land neighbours early, and secure the strait before the opponent can contest it; treat the interior highland nations as depth and the coastal nations as trade-ship access rather than as separate fronts. Read the lobby tier first, because a 100-player Red Sea board is a different game from a compact private one, and the strait is the line that both sides are reaching for from the first minute.
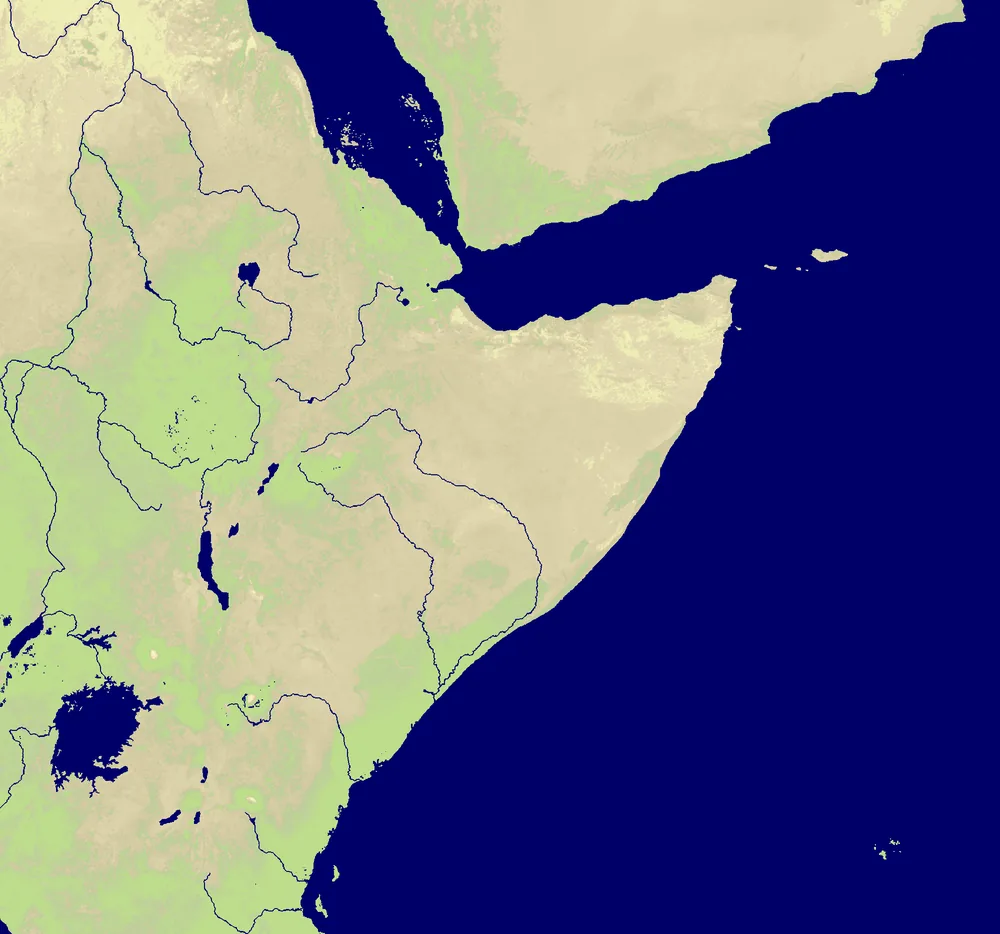
Horn of Africa is the v0.35 map that puts a real sea strait at the center of a land-heavy board. The board is 2000 by 1864 tiles with 2,024,462 of them land, which is the same land tier as Vancouver Island and enough to trigger the largest public lobby the v0.35 land-driven sizing formula produces. The Red Sea runs through the middle of the map, and its southern mouth is the Bab el-Mandeb corridor, the narrow water gap where the sea meets the Gulf of Aden. That corridor is the only real sea route between the Arabian-side land mass on one side and the East African land mass on the other, and it is the position the match is about. The map also has an inner water system, the Nile and Lake Victoria, that the OpenFront wiki describes as the defining internal water feature. Because the land is wide and the sea is narrow, the game is not about sprawling across the board; it is about choosing which side of the strait you belong to, anchoring on a named nation there, and deciding when to push the corridor itself. This guide gives you a repeatable framework for the four decisions the map actually forces: which lobby tier you are dropped into, which side of the strait to commit to, which named nation to anchor on, and how to play the sea against the interior rather than as a separate front.
Version boundary: what v0.35’s Horn of Africa actually is
The single most important thing to pin down before you plan a spawn is that Horn of Africa is a v0.35 map and it carries the two v0.35 behaviours that reshape every board it appears on. It shipped in the v0.35.0 formal release on October 16, 2026, and the OpenFront wiki’s Update 35.0 entry describes it in one line as a pirating chokepoint off Somalia and an inner water system from the Nile to Lake Victoria, added by RickD004. The map carries the official new rotation category and a multiplayer_frequency of 5, which the v0.35.2 overview places in the middle of the new regional maps, above the low-frequency draws and below the arcade maps that dominate the queue. That frequency of 5 is what you should internalize: it is a real public draw you can expect to land on without forcing it, but it is not the map you will see most, so you should arrive with a plan instead of improvising.
The second v0.35 behaviour on the board is the land-driven lobby sizing, which replaced the flat player cap. Horn of Africa sits in the same land tier as Vancouver Island, with 2,024,462 land tiles on a 2000 by 1864 grid, and the formula reads the land tile count to set the lobby tier, so the map rolls a 100-player large lobby in FFA, 75 in a medium setting, and 50 in a small setting, with team mode scaled up to 150. That tier is not a detail: it changes how many named nations are competing for the strait at once, and it means the strait is usually contested from more than one direction before the match is a few minutes old. The third thing to note is the nation layer. The manifest lists 29 spawn nations and 33 overflow names, and it fragments Ethiopia into 8 subnational flag entities and Somalia into 6, which is why the map renders with more colored regions than the 29 nations you actually spawn into. When you read the board, the 29 nations are the playable anchors and the extra colored regions are subnational flags on the same nation’s land, not new opponents. The current stable line is v0.35.9, and the manifest for Horn of Africa is unchanged from v0.35.0 through that cursor, so the description in this guide is current as of that cursor. If you are playing on a version before v0.35.0, this map does not exist yet, and the lobby sizing and spawn-recovery rules described here do not apply to the older flat-cap boards.
Decision framework: read the tier, the side, the anchor, the strait
The framework is a four-step read you run before the countdown ends and then re-check at the ten-minute mark. The first step is the tier, and the read is to confirm you are in the 100-player large lobby, the 75-player medium, or the 50-player small, because the number of nations reaching for the strait changes how fast you must secure it. In the large lobby the strait will be contested from several directions and you should assume you will not hold it alone, so your goal is to be the first nation across or to force the contest onto your chosen side. In the small lobby the strait is a two-or-three-nation fight and holding it outright is realistic if you anchor early. The second step is the side, and the read is to decide whether you belong to the Arabian-side land mass or the East African land mass, because the sea sits between them and crossing to the other side later is a full naval commitment that most openings cannot afford. The third step is the anchor, and the read is to pick one named nation on your chosen side that has a deep land connection to at least one neighbour and a sea exit, because that combination lets you defend on land while the coast still feeds your trade ships, and because anchoring on a coastal nation with no interior depth is the single most common way the opening is lost on this board.
The fourth step is the strait, and the read is to time when to push the Bab el-Mandeb corridor. The corridor is narrow enough that a small committed force with a transport line can hold it, but it is also the one position both sides want, so pushing it from a single coastal spawn with no interior support behind you is how you lose the position you were reaching for. The rule is to push the strait only after your anchor and one neighbour are stable, so the strait has a defended line of communication behind it. To make the four steps concrete, here is the board read for the two halves:
| Read | Arabian-side land mass | East African land mass |
|---|---|---|
| Sea access | Direct Red Sea coast, short trade-ship hops to the strait | Red Sea coast plus the Nile and Lake Victoria inner water system |
| Land depth | Wide interior connecting to the Arabian interior | Fragmented Ethiopia (8 subnational flags) plus Somalia (6 flags) |
| Strait reach | Reaches Bab el-Mandeb from the north and the east | Reaches Bab el-Mandeb from the south and the west |
| Typical anchor | A named coastal nation with an interior neighbour | A named nation that links the coast to the highland interior |
| Main risk | Over-extending toward the strait from a thin coast | The fragmented interior splits your neighbours into rival flags |
That table is the whole decision in one glance. You pick the side that matches your plan, pick the anchor that the table says is a safe named nation on that side, and then the strait becomes a scheduled push instead of a scramble. The framework holds in team mode too, where the read is the same except the side question becomes which half of the team owns the strait and which half owns the interior, and the anchor question becomes which team member owns which named nation so the strait has a named owner.
Scenario A: 100-player FFA, commit to the strait early
This is the primary scenario, because OFstats shows the map is played mostly FFA at mid-to-large lobby sizes, with the large 100-player tier as the common draw. You spawn into the East African half, on a named nation that links the Red Sea coast to the highland interior, so you have both trade-ship access and land depth. Your opening is to take your anchor, then take the one interior neighbour that gives you the highland line, before you spend anything on the coast. The reason is that the interior is where the fragmented Ethiopian flags sit, and those subnational flags are the most contested land on the map because they are the depth behind every coastal nation. By the time the first transport lines are heading for the strait, you should have your anchor, your interior neighbour, and a trade-ship line already established, so the strait push has a defended supply line behind it.
The number that makes this scenario a decision instead of a guess is the strait timing. In a 100-player board the strait is usually first touched around the five to seven minute mark, and the nation that arrives there with a defended line of communication holds it, while the nation that arrives as a single coastal probe is pushed back. So the play is to have your anchor and neighbour stable by minute four, to launch your first strait probe at minute five with a transport line behind it, and to be willing to hold the probe as a forward base rather than a permanent position if the contest is too hot. The failure to watch for is over-extending: if you push the strait and then your interior neighbour is grabbed by a third party, your strait base becomes an island with no supply, and it will be cut off. The counter is to keep one interior nation as your reserve, so the strait always has a second line of communication, and the reserve is what lets you fall back from the forward base without losing the position entirely, which is the difference between a temporary setback and a lost front. When the strait is held, the payoff is that every trade ship crossing the Red Sea between the two land masses is now under your control, and that is the income advantage that wins the large-lobby match, because the board is too wide for anyone to hold the whole thing and the strait is the one place where the sea and the land meet.
Scenario B: 50-player small lobby, hold the strait outright
This is the secondary scenario, a compact board where the strait is a two-or-three-nation fight and holding it outright is realistic. You spawn into the Arabian-side half, on a named coastal nation whose interior neighbour points toward the Arabian interior rather than toward the fragmented East African flags. Your opening is the same shape but at a smaller scale: take the anchor, take the interior neighbour, establish the trade-ship line, and because there are fewer nations, you can afford to commit more of your force to the strait from the start. The difference from the large lobby is that in the small lobby you do not have to settle for a forward base; you can put enough force through the corridor to actually hold it and deny the opposing side the crossing.
The decision here is how much force to commit. In the small lobby the strait is worth a real standing force because it is the one position that controls the sea axis and the board is small enough that holding it is sustainable. The number to watch is the size of the opposing force that reaches the strait: if it is a single nation, you hold with a small force and keep the rest in reserve for the interior, and if it is two nations, you hold with a larger force and you should be prepared to fall back to the forward-base posture from the large-lobby scenario if the contest gets too heavy. The failure to watch for is the opposite of the large-lobby failure: in the small lobby the risk is not over-extending, it is under-committing, because if you hold the strait with a token force and the opposing two nations combine, they break your position and take the crossing you were supposed to own. The counter is to commit enough to the strait to deny the crossing even if you lose the position, so that even a failed hold leaves the opposing side paying a real cost for the crossing. When you hold the strait in the small lobby, the payoff is even more direct than in the large lobby, because the board is small enough that the strait controls a larger share of the total trade traffic, and the income advantage from that share is enough to out-build the nations that did not contest it, so the single most important early decision in the small lobby is committing enough to the strait to make the crossing costly for anyone who tries to take it.
Failure modes and counterplay
The first failure is committing to the strait before your anchor and neighbour are stable, and it happens because the strait is the most obvious high-value position on the board, so players reach for it early and arrive without a line of communication behind them. The counterplay for the opponent is to hold the interior neighbour you were trying to use as your supply line, so your strait base has no second line and gets cut off, and the read for you is to not push the strait until the anchor and one neighbour are both in hand, which is what the framework’s fourth step enforces. The second failure is anchoring on a coastal nation with no interior depth, and it happens because the coast is the attractive side of the map and the trade-ship access is visible, but the interior is where the real land depth is, and a coastal anchor with no depth gets out-flanked from the highland interior. The counterplay for the opponent is to take the interior nation that your coast depends on and turn your coast into a position that can be denied, and the read for you is to anchor on a nation that the table says links the coast to the interior, not on a pure coastal nation.
The third failure is treating the fragmented interior as one opponent when it is several flags, and it happens because the Ethiopian and Somali subnational flags render as separate colored regions, so a player reads the interior as a single block when it is actually a set of rival flags that can be split. The counterplay for the opponent is to grab one of the subnational flags adjacent to your anchor and turn it into a hostile neighbour, so the interior you were relying on as depth becomes a front you have to defend. The read for you is to know that the 8 Ethiopian flags and the 6 Somali flags are subnational positions on the same nation’s land, and that the ones adjacent to your anchor are the ones you either take early or have to watch, and the read for the strait is that the interior contest is what decides whether your strait has a supply line behind it. The fourth failure is the small-lobby under-commitment, and the counterplay is the combined force from the opposing nations, so the read is to commit enough to the strait to deny the crossing even in a failed hold. The meta-counterplay that wins the match in both scenarios is the same: be the nation that owns the strait with a defended supply line, because the board is too wide for anyone to hold the whole thing and the strait is the one position where the sea and the land meet, so whoever holds it with depth behind it controls the income axis that the rest of the match is played over.
Reading the spawn nations and the subnational flags
The spawn table is the part of the board most players misread on this map, so it is worth stating plainly. The manifest lists 29 spawn nations and 33 overflow names, and the 33 overflow names exist because the game pads the spawn pool past the visible nation count so that late joiners and re-rolls have a named place to land. That means when you open the map you will see more colored regions than there are spawn nations, and the extra regions are not additional nations but the same nations rendered once more for the overflow pool. The two places this matters most are Ethiopia and Somalia, where the manifest splits each nation into subnational flag entities: Ethiopia renders as 8 separate colored subnational flags and Somalia as 6, so the horn of the continent, which is the part of the board the strait connects to, is not two solid blocks but fourteen smaller flag positions sitting on top of two nations’ land.
The read this gives you has three parts. First, the horn looks more contested than it is in the spawn sense, because the fourteen subnational flags are all on Ethiopian and Somali land, so a fight that looks like a six-way scramble over the horn can actually be a two-nation contest with a lot of subnational texture. The counter you should make is to treat the horn as a two-front problem, one front against the Ethiopian interior and one against the Somali coast, and to pick the front that your anchor can actually reach. Second, the subnational flags are the positions that decide supply, because a strait base is only as strong as the flag behind it, and if the flag behind your strait is one of the fourteen horn subnational positions rather than a deep interior nation, your strait has thin depth and the opponent can deny it by holding the next flag in. Third, the fragmentation is a timing tool, because the subnational flags come up in a defined order as the lobby fills, so a player who reads the table knows which horn flags will be taken early and which stay open late, and the read for the opening is to take the flag that both links your anchor to the strait and leaves at least one open flag behind you as a fallback, rather than grabbing the most central horn flag and finding that every flag behind you is already hostile.
The concrete version of this is to pick your anchor from a nation that the table shows linking the coast to the interior, take one horn subnational flag that keeps your strait supply line open, and leave a second horn flag open as the fallback position you can reach if the first front collapses. Do that and the horn stops being a wall of colors you have to improvise against and becomes two fronts you can read by name, which is the difference between a board you are guessing at and a board you are playing on a plan.
Mode and map adjustments
In team mode the read is the same four steps with two substitutions. The tier read changes because team mode scales the lobby up to 150, so the strait is contested by two teams instead of a loose set of nations, and the read is to assign the strait to the team half with the stronger sea force and the interior to the other half, because the strait needs a naval owner and the interior needs a land owner. The side read changes because the side question becomes which team owns which half, and the read is to pick the side that gives your team the named anchor it needs, which is usually the half with the deeper interior, because the fragmented Ethiopian and Somali flags make the East African half the one that needs more coordination and the Arabian half the one that is easier to hold. The anchor read is unchanged in shape, but the anchor becomes a team member’s named nation instead of a single player’s, and the read is to make sure the strait has a named owner on each team so the contest has a clear front instead of a scramble.
The strait read in team mode is the timing of when the two teams commit to the corridor, and because there are two owners instead of a loose set, the corridor tends to become a defined front line that holds for the middle of the match, and the read is to treat that front line as the match’s main axis and to build the economy around holding it. On the map axis, the adjustment is that the strait is the same physical corridor in every setting, but the inner water system matters more in the larger lobbies, because the Nile and Lake Victoria give the East African half a second water route that the larger boards use to bypass the strait, and the read is that if you hold the strait but the opposing side builds the inner-water route, your strait hold is partially bypassed, so the strait and the inner water system are the two sea positions to watch, not just the strait. The mode and map adjustments boil down to one line: in team mode assign the strait to the naval half and the interior to the land half, and on the map axis watch both the strait and the inner water system, because the board is wide enough that holding one sea position while the other is open is how you lose the income axis.
What this guide is and the systems it feeds
This guide is the single main answer for the Horn of Africa board, and it answers the question of where to commit before the countdown ends on a v0.35 land-heavy map with a sea strait. The version boundary is that it describes the board as of the v0.35.0 release and the current v0.35.9 cursor, where the manifest is unchanged, so the 29 nations, 33 overflow names, 2,024,462 land tiles, 2000 by 1864 grid, and frequency 5 are all current. The decision framework is the four-step read of tier, side, anchor, and strait, and the two scenarios are the 100-player FFA that pushes the strait early with a defended supply line and the 50-player small lobby that holds the strait outright. The failure modes are the four ways the match is lost, the strait push before the anchor is stable, the coastal anchor with no depth, the fragmented interior read as one opponent, and the small-lobby under-commitment, and the counterplay is the one way the opponent wins, holding the supply line behind your strait. The mode and map adjustments are the last piece, which is that team mode assigns the strait to the naval half and the map axis watches both the strait and the inner water system.
For the broader systems this opening feeds into, the lobby-size map-driven guide covers the land formula and the tier table that this guide applies to Horn of Africa, the map strategy guide covers connected land and water networks on any board, which is exactly the strait-and-inner-water system on this map, the island defense guide covers how to screen a spawn and when a disconnected sea route means you should fall back to land, and the naval stalemate and blockade guide covers how to hold a crossing when the enemy is trying to deny it, which is the strait fight in both scenarios. Bring those into the same decision and the Horn of Africa opening stops being a guess about which side of the Red Sea looks central and becomes a plan about which side, which anchor, which strait timing, and which inner-water route you are committing to before the countdown ends, which is the only time the whole thing is still in your hands. The board is wide enough that a wrong side is recoverable for a short while, but the strait makes the correction a crossing, and crossings cost time and a unit that you may not be able to afford if you have already burned your early game on a bad start, which is why the players who win on this map are usually the ones who read the tier and the side carefully and committed to a named anchor with a named strait timing and a named inner-water route, rather than the ones who picked the familiar side by instinct and then had to improvise the crossing.
Related content
Use OpenFront v34.3 costs, troop growth, route payback, and stop signals to choose City, Port, Factory, defense, or a liquid reserve without copying a fixed script.
- OpenFront AFK Teammate Takeover: Absorb a Disconnected Ally for Zero Troop Loss
A Team-mode decision guide for what a teammate's disconnect does to your win/loss position, when absorbing their land is free, when it is a trap, and what the 30-second mark and the ranked 2v2 rules actually change.
Sep 23, 2026
- How Nations Aim Their Nukes: Smarter Targeting, No Wasted Blasts
A strategy guide for the upcoming AI Nation nuke targeting change: Nations now compute how much of a blast hits enemy land before firing (atom 25%, hydrogen 40% minimums), they skip a spot where another player's nuke is already landing, and they never nuke a target that would hit friendly land. What changes in your decision, the coverage gate, the anti-double-nuke rule, the failure mode and the mode/map adjustments.
Oct 8, 2026
- OpenFront Annexation and Enclosure: Close Pockets Without Overextending
Learn how to take small footholds, close an enemy pocket, and keep a second route after the capture instead of turning a lead into a fragile border.
Sep 4, 2026