GUIDES
Bab el-Mandeb Strait: Read the Gate, Pick a Side, and Hold the Crossings
Pick your Bab el-Mandeb opening by side, gate, and crossing: the map splits into two coastlines around one narrow water gap, and the team or player who controls the strait crossing controls the match. A verified, decision-ready strategy guide for the v0.35.0 map.
Map identity and version boundary
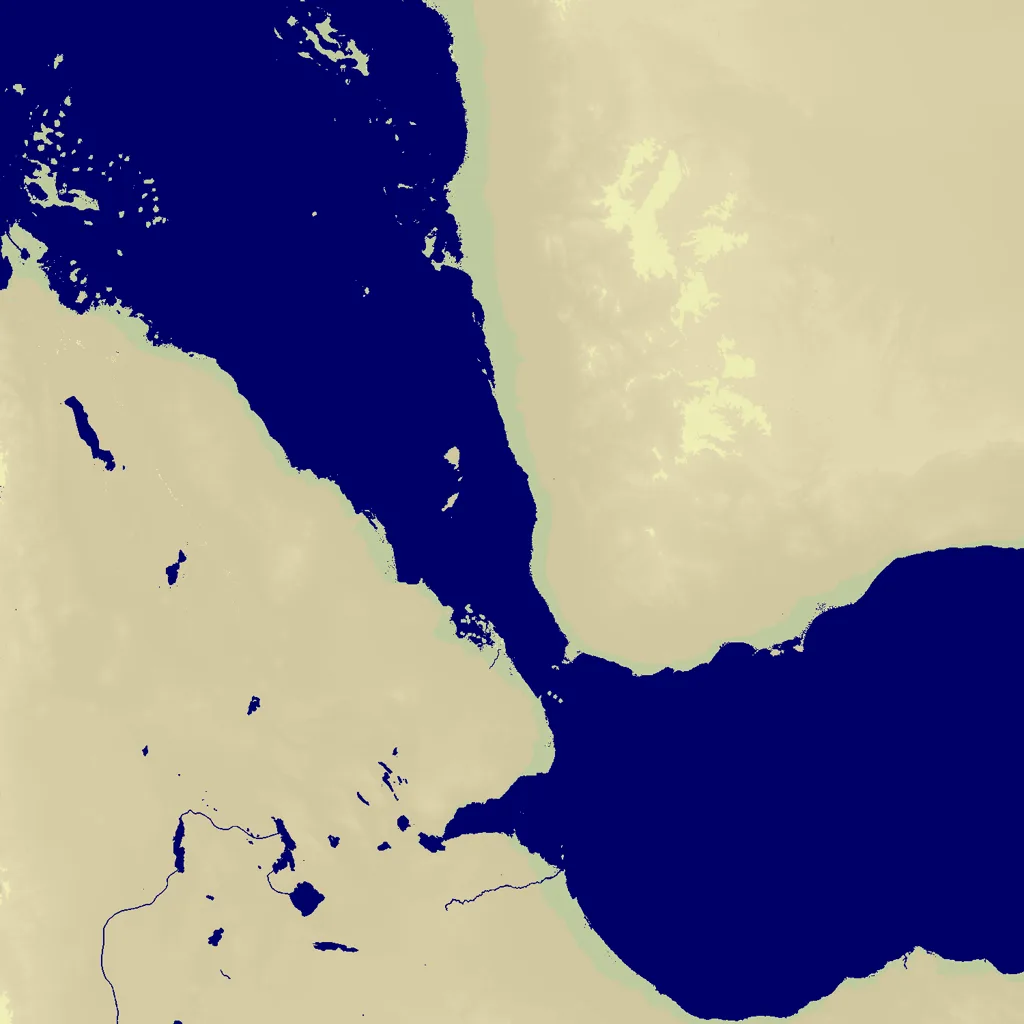
Bab el-Mandeb Strait is one of the twelve new maps that shipped in the v0.35.0 release, published on 2026-10-16, and it has carried no manifest changes since that release through the current formal release, v0.35.5. The map’s official description in the v0.35.0 release notes is “a balanced two-team map set in the early 1960s, with the region’s flags,” and that line carries three facts at once that shape how you should read the board. It is built for a balanced two-team contest, which means the two team groups are usually on opposite sides of the gap and the match is a crossing contest from the first second. It is set in the early 1960s, which is why the roster is a wide historical set of states from Yemen, Eritrea, Ethiopia, and Somalia rather than a modern country list. And it uses the flags of the region’s historical states, which is why your spawn flag is a period detail rather than a fixed advantage. The design intent behind all three is the one that matters for play: this board is built around a single narrow water gap that separates the two sides, and the match is decided by who controls the crossing of that gap.
The map’s manifest defines a wide historical roster of forty-one starting nations, split across two team groups. The official upstream manifest lists the full nation set, and the split is what makes the map playable as a two-team contest even in the smaller lobbies. The nation pool spans North Yemen, South Yemen, the Sheikham Movement, the Kingdom of Sheba, Aden, the sultanates and sheikhdoms of southern Yemen, the Eritrean sultanates, the Ethiopian Empire, Ethiopia, Eritrea, Somalia, Somaliland, the Somali Sultanates and Kingdoms, and the Sultanates of Oman and Dhofar. Because the roster is large and historically varied, your spawn is not a fixed country you should memorize as a static advantage; the strategic value of the map comes from the side you are on and the gate nearest to you, not from a specific flag. The map image ships with the upstream repository as a 1500 by 1500 reference, and the generated map data carries it as a dedicated entry in the site’s map index.
The version boundary matters for two practical reasons. First, because the map shipped in v0.35.0, any guide or video describing an earlier OpenFront version predates this map and cannot be used to predict its spawn layout, nation list, or team configuration. Second, because v0.35.5 is the current formal release and no manifest change has landed between v0.35.0 and v0.35.5, the facts in this guide hold across that entire window. If a future release touches the Bab el-Mandeb manifest, the nation list or the team split could change, and the numbers here would need re-verification against the new manifest before you trust them again. Treat this guide as correct for the v0.35.0 through v0.35.5 window, and re-check the manifest whenever a new formal release lands.
The map also belongs to the same design family as the site’s other specialized water maps, which is why the opening decisions here are familiar if you have played them: pick a side, identify the gate, plan the crossing, and keep a second route alive. The difference on Bab el-Mandeb is that the two sides are not two continents the way the Strait of Gibraltar splits Europe and Africa; they are two coastlines of a single regional board, connected by one narrow strait and a set of island clusters that sit in the water between the two shores. That single-gap topology is what concentrates the match into a handful of high-value crossing points rather than spreading it across a wide open ocean.
How the geometry actually reads
Read the official map image and the layout resolves into three zones you should name out loud before the countdown ends. The first zone is the strait itself, the narrow water gap that runs roughly along the center of the board and is the only reliably short crossing between the two sides. Every match on this map is, underneath every other mechanic, a contest over that gap, because any player or team that can project power across the strait can pressure the other side’s coast, capture its ports and factories, and force its units to defend a long front instead of building. The second zone is the two coasts, the African Horn on one side and the Arabian peninsula on the other, which hold the dense land borders where most of the land combat and the annexation chains happen. The third zone is the island clusters that sit in the water around both coasts and in the gap, which are the map’s chokepoint tools: a well-timed island capture lets you screen a transport crossing, deny a port lane, or build a bridgehead that shortens the strait for your team.
The narrowness of the gap is the defining property. Unlike a wide open map where a crossing can happen anywhere, here the strait funnels movement into a small number of lanes, so the defenders of a side do not have to cover the whole coast, only the lanes. That is the single most important defensive fact about the map, and it is the reason a smaller team or a slower player can hold a strait crossing against a larger push: the attacker has to bring the crossing through the same narrow lanes the defender is already watching. The lanes are where ports and factories sit, because the map generator places economy buildings on the coasts and islands that border the water, which means the chokepoint and the economy are the same place. Capture the lane and you capture the income that funds the next push, which is why the first crossing of the strait in a match is almost always more valuable than any crossing that happens later.
The island clusters change the reading. On a pure coast map, the strait is the only crossing and it is a single fixed point. On Bab el-Mandeb, the islands in the water give you intermediate stepping stones, so the strait becomes a short chain of hops rather than one long jump. A player who takes the island nearest their own shore first can then screen the next hop, and a team that takes the island on the enemy’s side of the gap can project power straight onto the enemy coast. The islands are also where the map’s naval tools concentrate, because a Warship or a transport that controls an island controls the lanes that run past it. The practical consequence is that the early game is not about racing to the far shore, it is about racing for the islands in the middle of the gap, because the island chain is what turns a long, expensive crossing into a short, cheap one.
The forty-one nation roster is wide enough that your exact spawn flag is usually not the important variable, but the side of the gap you are on is. Two players on the same side of the strait are effectively cooperating on the crossing question, whether or not they are in the same team, and two players on opposite sides are the natural competitors for the gap. In free-for-all play this means you should identify your strait side in the first seconds of the match and decide whether you are going to fight for the crossing or stay on your coast and build the economy the crossing is meant to fund. In team play it means the two team groups defined by the manifest are usually on opposite sides of the gap, so the team match on this map is a strait crossing contest from the start, and the side that wins the gap wins the match.
Decision framework before the countdown closes
The countdown before the match starts is the only window in which the whole board is still in your hands, because once the first spawns land the side and the gates are already claimed. The framework you want to run in that window has four steps, and each one takes a few seconds if you know what to look for. Step one is to read your side of the strait. Look at the map image or the spawn preview and identify which coastline your spawn is on, the African Horn or the Arabian peninsula, and whether your spawn is near the gap or deep on the coast. Step two is to read the gates. The gates are the short land connections and the island hops that let you cross the strait, and the map’s two team groups and its island clusters define a small set of them, so name the two or three gates nearest your spawn out loud and decide which one you would use if you had to cross in the first minute.
Step three is to read the economy on your side. Because the map generator places ports and factories on the coasts and islands that border the water, your side of the strait has a small set of high-value economy spots, and the question in the countdown is whether you can reach the one nearest you without crossing the gap. If your spawn is near the gate, the first port or factory is usually a short walk or a single island hop away, and the opening decision is to commit to that economy immediately. If your spawn is deep on the coast, the first economy is a longer land march, and the opening decision is to decide whether to march or to push for the gate. Step four is to read the opponent side. If the opponent spawn is visible or the team split is known, identify the gate the opponent is nearest, because that is the crossing they will try first, and decide whether you want to meet that crossing at the gate or fall back to your coast and force them to come to you.
| Decision | Read in the countdown | If it favors your side | If it favors the opponent |
|---|---|---|---|
| Strait side | Which coastline your spawn is on: the African Horn or the Arabian peninsula | You hold the gap; play the cheaper defensive screen | You must cross; concentrate on the thinnest lane |
| Gates | The two or three crossings nearest your spawn, plus the next gate for the flanking crossing | Name your main gate and your second screen gate | Name their nearest gate and pre-position the counter-screen |
| Economy | The nearest port or factory on your side of the gap | Claim it before committing to the gate; it funds the screen | Starve their port and force their crossing to be unfunded |
| Crossing | Whether you will fight for the gap or hold your coast | Take the nearest island and project power across | Stay on your coast and let the crossing players fight in the gap |
The decision the framework produces is a single sentence you should be able to say before the countdown ends: which side am I on, which gate am I using, which economy am I funding, and which crossing am I defending. A player who can say that sentence is playing a plan, and a player who cannot is reacting to the first contact. On a map like Bab el-Mandeb, where the strait concentrates the match into a handful of lanes, the player who names the lane in the countdown usually holds it for the first few minutes, and holding the first few minutes is holding the income that funds the rest of the match. The framework also tells you when to skip the crossing: if your side has a dense economy and the opponent side is the one that needs the crossing, the correct play is to hold the gate and let them come to you, because the defender of a narrow strait is always the cheaper side.
The countdown framework also tells you how to read the two team groups. In team mode the manifest’s two groups are usually on opposite sides of the gap, so the team match is decided by which team wins the crossing, and the framework collapses to a team question: does my team have the gate, the island chain, and the economy on our side of the gap, or do we have to fight across the strait to get them? If your team has the gap side, play defensively and force the enemy crossing to be long and expensive. If your team has to cross, play offensively and concentrate the crossing on the one gate where the enemy screen is thinnest. The single most common mistake on this map is a team that wins the side but then spreads its units along the whole coast instead of concentrating them on the gates, which gives the enemy team a free crossing through the thin lane. The countdown framework is the only place you can fix that mistake, because once the match starts the gates are claimed and the crossing is already in motion.
Scenario A: the free-for-all crossing
In a free-for-all match on Bab el-Mandeb, the map’s forty-one nations mean a large field of players, and the strait gap is the one place where most of those players end up competing. The scenario you should be able to run is the crossing scenario: you start on one side of the gap, your economy is on your coast, and the players you most want to pressure are on the far side. The first decision in a free-for-all is whether you are the crossing player or the coast player. If you are the crossing player, your plan is to take the nearest island in the gap, use it as a bridgehead, and project power onto the far coast before the far-side players build the screen that stops you. If you are the coast player, your plan is to stay on your side, build the port and factory that fund your side, and let the crossing players fight it out in the gap while you hold the economy.
The crossing player’s opening is a short sequence. First, take the island nearest your shore in the gap, because the island is the only place you can hold a screen without committing your whole army to the water. Second, build a small screen on that island, one or two units, just enough to stop the first enemy probe. Third, use the island to time your crossing, because the island lets you see the far coast without crossing, so you can wait for the far-side player to commit units to the gate and then cross into the gap when their screen is thin. The crossing player’s economy is the far-side port or factory, and the whole point of the crossing is to capture that building, because a captured port or factory on the far side funds the next crossing and keeps the far side under pressure. The free-for-all crossing is a tempo game, because the player who crosses first and captures the far-side economy is the player who funds the rest of the match, and the players who stay on the coast are the ones who fund the crossing player.
The coast player’s opening is the mirror image. First, march to the nearest port or factory on your side of the gap, because the coast economy is the fund for everything else. Second, build the screen on the gate nearest the gap, because the gate is where the crossing player will come, and a screen at the gate is the cheapest way to stop the crossing. Third, use the gate screen to deny the crossing player the bridgehead, because if the crossing player cannot take the island or the gate, they cannot cross, and the coast player keeps the economy. The coast player’s risk is the flanking crossing, because a free-for-all crossing player who cannot take your gate will try to take the next island on the coast and cross there, so the coast player has to keep a second screen on the next gate or the next island. The two scenarios are the same match seen from two sides, and the player who reads which side they are on in the first minute usually wins the match.
The free-for-all ending on this map is a strait contest. When the two sides are roughly equal, the match is decided by who holds the gap in the endgame, because the gap is where the last economy is captured and where the last crossing happens. A player who holds the gap in the endgame can keep crossing to capture the last far-side building, and a player who loses the gap is stuck on their coast with no way to fund the final push. The practical free-for-all rule is simple: if you are winning, hold the gap and keep crossing; if you are losing, force the crossing player to spend units on the screen so they cannot fund the final capture. The strait is the endgame, and the player who understands that is the player who closes the match.
Scenario B: the two-team strait fight
In team mode the manifest’s two team groups make the map a strait crossing contest from the start, because the two teams are usually on opposite sides of the gap. The scenario you should be able to run is the team crossing scenario: your team is on one side of the gap, your team’s economy is on your coast, and the enemy team is on the far side with their economy on their coast. The first decision in a team match is the same as the free-for-all decision, which side of the gap is your team on, but the second decision is new and it is the team question: does your team have the gate, the island chain, and the economy on your side, or does your team have to cross the strait to get them.
If your team has the gap side, the team play is defensive. Your team holds the gates on your side of the gap, screens the lanes, and lets the enemy team come to you, because the defender of a narrow strait is the cheaper side and the enemy team has to spend units on the crossing that you do not have to spend. The defensive team’s economy is the port and factory on your coast, and the whole point of the defense is to fund that economy while the enemy team burns units on the crossing. The defensive team’s risk is the flanking crossing, because the enemy team will try to find the thin lane and cross there, so the defensive team has to keep screens on all the gates, which means the team has to split its units and the question becomes how many gates the team can cover. The answer on this map is the same as the free-for-all answer: cover the nearest two gates with the main screen and use the island chain to extend the screen to the third gate, because the islands are what let a small team cover a wide front.
If your team has to cross the strait, the team play is offensive. Your team concentrates the crossing on the one gate where the enemy screen is thinnest, takes the island chain on the way, and captures the enemy port or factory on the far side. The offensive team’s opening is a coordinated push: one team member takes the nearest island, one team member screens the gate, and the rest of the team follows the crossing once the island is held. The offensive team’s risk is the screen, because if the enemy team holds the gate, the crossing is expensive and the offensive team has to spend a long time breaking the screen, during which the enemy team funds its economy. The offensive team’s counter is to take the island first, because the island shortens the crossing and lets the team screen the gate from the far side, so the enemy gate screen has to face the island screen too, which splits the enemy team’s defense.
The team endgame on this map is the same strait contest as the free-for-all, but it is a team version of it. The team that holds the gap in the endgame keeps crossing to capture the last enemy building, and the team that loses the gap is stuck on its coast. The practical team rule is the same as the free-for-all rule: if your team is winning, hold the gap and keep crossing; if your team is losing, force the enemy team to spend units on the screen. The team match on Bab el-Mandeb is the purest version of the map, because the two team groups are the two sides of the strait and the match is the crossing, so the team that understands the crossing wins the team match.
Failure modes and opponent counterplay
The failure mode that ends most matches on this map is the spread. A player or a team that wins the side of the gap but then spreads its units along the whole coast instead of concentrating them on the gates gives the opponent a free crossing through the thin lane. The counter to the spread is the concentration, which is the reason the decision framework asks you to name the two or three gates nearest your spawn instead of reading the whole coast. The spread also fails the economy, because a unit on the far coast is a unit not funding the gate, and the gate is where the match is decided. The practical fix is simple: keep the main screen on the nearest gate and use the island chain to extend the screen, and do not send units to the far coast unless the far-coast enemy is the one funding the crossing.
The second failure mode is the over-crossing, which is a crossing player who takes the far side and then cannot hold it. The crossing player captures the far-side port or factory and then the far-side counterattack arrives, and the crossing player is stuck on the far side with no way back to their own coast. The counter to the over-crossing is the bridgehead, which is the island in the gap that the crossing player took on the way across. If the crossing player holds the island, the far-side counterattack has to cross the island to reach the crossing player, and the island screen stops the counterattack. If the crossing player does not hold the island, the far-side counterattack crosses the gap and the crossing player is stranded. The practical rule is to keep the island chain alive after the crossing, because the island is the way back as much as the way across.
The third failure mode is the economy neglect, which is a player or a team that holds the gate but lets the economy on their side go unclaimed. The gate is the crossing question, but the economy is the fund question, and a player who holds the gate with no economy behind it is holding the gate with no army, because the army comes from the port and the factory. The counter to the economy neglect is the fund-first rule, which is to claim the nearest port or factory on your side before you commit to the gate, because the gate screen is funded by the coast economy and the coast economy is funded by the port. The practical fix is to march to the port before you march to the gate, and to keep a unit on the port even when the gate is under pressure, because the port is the army and the gate is the question.
The opponent counterplay on this map is the flanking crossing, which is the player or team that cannot take your main gate and so takes the next gate or the next island. The counter to the flanking crossing is the second screen, which is the screen on the next gate or the next island that the decision framework asks you to name in the countdown. The flanking crossing also tells you that your main gate is held, which is good news, so the flanking crossing is a signal to hold the main gate and extend the screen to the flank, not to abandon the main gate. The practical rule is to keep the main screen and add the second screen when the flank is threatened, because the main gate is where the match is decided and the flank is where the match is won. The three failure modes and the one counterplay are the whole of the map’s tactical content, and the player who can run them is the player who wins the strait.
Mode and map adjustments
The mode you are playing changes the Bab el-Mandeb reading in a small number of ways, and the map itself changes the mode reading in a few more. The first mode adjustment is team size. In a two-player team match the two teams are the two sides of the strait and the match is a pure crossing contest, so the team framework applies directly. In a larger team match the extra players on each side mean the team can cover more gates, so the spread failure is less likely and the concentration can cover the whole front, which changes the decision from which gate to hold to how to divide the gates among the team. In a free-for-all match the extra players mean the crossing is a multi-player contest, so the crossing player has to worry about the second crossing player as much as the coast player, and the decision framework adds a step, which is to identify the second crossing player and decide whether to compete with them or let them fight the coast player.
The second mode adjustment is the nuclear tools. The map’s ports and factories on the coast and islands make the strait gap a nuclear target, because a nuke on the gate or the island destroys the screen and opens the crossing. The nuclear reading on this map is the same as the reading on any water map, which is that the gap is the target and the island is the screen, but the Bab el-Mandeb version is that the narrow gap makes the nuke more effective, because the nuke destroys the only screen the defender has. The counter to the nuclear crossing is the island chain, because the nuke destroys one island and the crossing still has to cross the next island, so the island chain extends the defense beyond the nuke’s radius. The practical nuclear rule is to keep the island chain alive, because the nuke destroys one island and the chain stops the crossing.
The third mode adjustment is the Doomsday Clock. The Doomsday Clock on this map is the same as on any map, which is that the under-40% side is fighting to survive the wave, but the Bab el-Mandeb reading is that the under side is usually the side without the gap, because the side without the gap is the side that cannot cross to capture the last economy. The Doomsday reading on this map is the same as the strait reading, which is that the side with the gap is the side that can keep crossing to capture the last building, so the under side has to force the crossing side to spend units on the screen. The practical Doomsday rule is the same as the strait rule, which is to hold the gap if you are winning and force the crossing if you are losing.
The map adjustment is the same as the mode adjustment, because the map is the mode on this board. The narrow gap, the island chain, and the coast economy are the whole of the map, and the mode changes the reading of those three things in the ways above. The practical summary is that the mode tells you how many gates to cover and how many crossing players to worry about, and the map tells you where the gates are and where the crossing is. The player who can read both is the player who plays the map correctly, and the map is the one that decides the match. The mode and map adjustments are the last piece of the Bab el-Mandeb reading, and they are the reason the map is a decision map, because the decision changes with the mode and the decision changes with the map, and the player who can read both changes is the player who wins the strait.
What to take into your next match
The single takeaway from Bab el-Mandeb is that the match is the crossing, and the crossing is the strait, and the strait is the gap. The map is built around one narrow water gap, and the match is decided by who controls that gap, so the whole of the strategy is the gap. The decision framework is the tool, which is to read your side, read the gates, read the economy, and read the opponent side in the countdown, and the scenarios are the two ways the match plays out, the free-for-all crossing and the two-team strait fight. The failure modes are the three ways the match is lost, the spread, the over-crossing, and the economy neglect, and the counterplay is the one way the opponent wins, the flanking crossing. The mode and map adjustments are the last piece, which is that the mode changes how many gates to cover and the map changes where the gates are.
For the broader systems this opening feeds into, the transport landing guide covers the crossing itself and when a transport is a tool rather than a gamble, the general map strategy guide covers connected land and water networks on any board, the island defense guide covers how to screen an island and when a disconnected sea route means you should fall back to land, the naval stalemate and blockade guide covers how to hold a crossing when the enemy is trying to deny it, and the team spawn formation guide covers how to split the two sides of the strait with an ally in Team mode. Bring those into the same decision and the Bab el-Mandeb opening stops being a guess about which side of the gap looks central and becomes a plan about which side, which gate, and which crossing you are committing to before the countdown ends, which is the only time the whole thing is still in your hands. The map is small enough that a wrong side is recoverable for a short while, but the strait makes the correction a crossing, and crossings cost time and a unit that you may not be able to afford if you have already burned your early game on a bad start, which is why the players who win on this map are usually the ones who read the countdown carefully and committed to a side with a named gate and a named crossing, rather than the ones who picked the familiar side by instinct and then had to improvise the crossing.
Related content
Use OpenFront v34.3 costs, troop growth, route payback, and stop signals to choose City, Port, Factory, defense, or a liquid reserve without copying a fixed script.
- OpenFront AFK Teammate Takeover: Absorb a Disconnected Ally for Zero Troop Loss
A Team-mode decision guide for what a teammate's disconnect does to your win/loss position, when absorbing their land is free, when it is a trap, and what the 30-second mark and the ranked 2v2 rules actually change.
Sep 23, 2026
- How Nations Aim Their Nukes: Smarter Targeting, No Wasted Blasts
A strategy guide for the upcoming AI Nation nuke targeting change: Nations now compute how much of a blast hits enemy land before firing (atom 25%, hydrogen 40% minimums), they skip a spot where another player's nuke is already landing, and they never nuke a target that would hit friendly land. What changes in your decision, the coverage gate, the anti-double-nuke rule, the failure mode and the mode/map adjustments.
Oct 8, 2026
- Alliance-Break Timing: When 30 Seconds Is Worth the Trade
Decide whether to break a live alliance now, wait for it to expire, or renew it, using the 30-second traitor window, the 0.5 defense and 0.8 speed debuffs, and the -100/-40 relation drops in OpenFront v0.34.
Sep 30, 2026