GUIDES
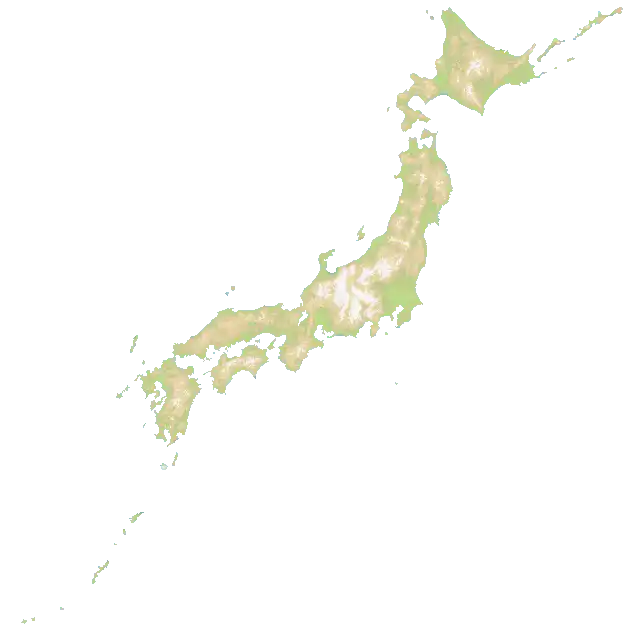
Japan Map: The Diagonal Archipelago, the 92% Water Box, and the One Chain That Decides Your FFA
A decision framework for the Japan map in OpenFront.io. The 2,500 by 2,500 diagonal island chain from Okinawa in the southwest to Hokkaido in the northeast, the 92 percent water that makes every crossing a fight, the 12 named nations strung along the chain, and which cluster to anchor before the countdown ends so a wrong pick stays recoverable in FFA.
What Japan actually is
Direct answer. Japan is a diagonal island chain in a 2,500 by 2,500 box that is 92 percent water, played FFA-only with twelve named nations and no overflow pool. Anchor the cluster you spawn in before the countdown ends, hold the one or two nations beside it, and treat the rest of the chain as a second front you cross when you have the navy, not as land you spread into. Read the FFA read first, because the water means every neighbour is a separate crossing and the player who holds a dense central cluster wins the long game.
Japan is the one regional map that turns the board almost entirely into ocean. It is a square box, two thousand five hundred by two thousand five hundred tiles, with four hundred seventy-eight thousand eight hundred ninety-four land tiles under the current manifest. Most of the game’s maps are land-dominant; this one is the opposite, and the water is the whole point. The real decision on Japan is not which nation to pick or which building to buy, it is which cluster of the diagonal chain you commit to before the countdown ends, and how you play the chain, the Okinawa tail in the southwest, the central Kansai and Kanto clusters in the middle, and the Hokkaido cap in the northeast, so that a wrong pick stays recoverable instead of fatal. The map is wet enough that a mistake on one crossing is a mistake on every crossing, and that is exactly why the framework below, which names the anchor cluster and the two neighbour clusters, is the difference between a lost match and a saved one. This guide assumes you already know the spawn pacing, the Port and Factory economics, and the Defence Post and Warship toolset; it only covers what Japan’s shape forces that the generic guides do not.
The version boundary is the v0.26.0 series, and the current formal release cursor is v0.35.6. Japan is a legacy regional map that predates the v0.30 and v0.35 map batches; it first appears in the v0.26.0 tag, committed 2026-05-12 as part of the MapPlaylist rework. Its manifest geometry has not changed across the later series: the width, height, land tiles, and the twelve named nations are the same on the v0.26.0 tag and on the v0.35.6 cursor, so the strategy you read here is the strategy the map has actually been for its whole life, not a preview of a future shape. The one post-introduction edit to the manifest, a land-tile adjustment from four hundred eighty-eight thousand one hundred eighty-three to the current figure and the removal of a per-nation strength field, did not change the board the player sees.
The water is the decision
The water on Japan is not decoration, it is the mechanism. On a board with four hundred seventy-eight thousand eight hundred ninety-four land tiles out of six million and two hundred fifty thousand total tiles, the land fraction is seven point six six percent, which makes Japan the most water-heavy map in the shipped pool by a wide margin. The comparison is the cleanest way to understand what the map does to a match. The table below puts Japan against the other regional maps by land fraction and by the mode it actually plays, and the gap is not a rounding error, it is the difference between a continent and a chain of islands.
| Map | Grid | Land tiles | Land fraction | Mode in manifest |
|---|---|---|---|---|
| Japan | 2,500 x 2,500 | 478,894 | 7.7% | FFA-only |
| Four Islands | 1,500 x 1,500 | 517,506 | 23.0% | 2-team |
| Cape Cod | 1,500 x 1,240 | 594,679 | 32.0% | FFA |
| Korea | 1,088 x 2,188 | 782,048 | 32.9% | 2-team |
| France | 2,424 x 2,424 | 2,047,093 | 34.8% | FFA |
| Vancouver Island | 2,600 x 1,980 | 2,012,664 | 39.1% | FFA |
The reading of that table is the whole of Japan’s tactical content. Every other map in the pool is a third or more land, which means the connected land masses are large enough that a player can expand across them by pure adjacency, building next to a neighbour and taking it without ever leaving the landmass. Japan is the exception. At seven point six six percent land, the connected land masses are the individual islands of the chain, and the space between them is water. That single fact changes every other decision on the map. The nation you take is not the nation next to the one you hold, it is the island you can reach with a boat. The economy you build is not the economy of a connected mainland, it is the economy of a single island that has to feed its own defence. The front you hold is not a land border, it is a screen across a stretch of water that any navy can contest.
The water also changes the way the board reads to a spectator and to an enemy. On a land-dominant map the borders between nations are visible as a continuous line across the landmass, and the player who holds the border holds the defence. On Japan the borders are the coastlines of the islands, and the open water between them is the contested space. The player who can project naval power across that water controls the chain; the player who cannot is trapped on their own island, rich in factories but unable to reach the next one. That is the entire strategic question of the map, and it is the question the framework below is built to answer: not which island looks rich, but which island you can hold and which island you can actually reach before the countdown ends.
The nation layer: one diagonal chain, twelve names
The twelve named nations on Japan are not spread across a connected continent, they are strung along a single diagonal that runs from the southwest corner to the northeast corner of the box. The manifest coordinates place them in a clean line, and the order from southwest to northeast is the order the chain is contested. Okinawa sits at the far southwest, at coordinate three hundred ninety-seven by two thousand two hundred eighty-three, alone in the corner. Then the chain climbs the diagonal: Kyushu at seven hundred nine by one thousand five hundred seventy, Shikoku at nine hundred forty-nine by one thousand four hundred fifty-four, the Kansai cluster around eleven hundred ninety-one by one thousand three hundred seventy, Chugoku at nine hundred thirty-two by one thousand three hundred eight, Kyoto at one thousand one hundred fifty-eight by one thousand two hundred ninety, Mount Fuji at one thousand four hundred ninety-three by one thousand two hundred forty-six, Chubu at one thousand three hundred ninety-one by one thousand one hundred ninety-four, Tokyo at one thousand five hundred sixty-five by one thousand one hundred seventy-eight, Kanto at one thousand six hundred thirteen by one thousand one hundred thirty-three, Tohoku at one thousand six hundred forty-seven by eight hundred ninety-seven, and Hokkaido at the northeast cap, one thousand eight hundred ninety-five by two hundred eighty-eight.
The reading of those coordinates is that the chain is not uniform, it has a dense middle and two sparse ends. The middle, from Chugoku through Chubu and Kanto, packs seven named nations into a band roughly seven hundred tiles wide, which is the part of the map where the named nations are close enough that a player can contest several of them in a single engagement. The two ends are sparse: Okinawa is a single named nation alone in the southwest corner, more than a thousand tiles from the next nation on the chain, and Hokkaido is a single named nation alone at the northeast cap, more than six hundred tiles from Tohoku. That shape is why the community complains about the far islands, the Okinawa tail and the Hokkaido cap are the parts of the map that are hardest to reach and hardest to hold, because a player who commits to them is committing to a crossing that the player on the middle can contest at every step.
The fact that the map carries zero additionalNations is the second part of the nation-layer reading. A map with an overflow pool, the additionalNations list, fills empty spawn slots with extra nations when the lobby is large, which means a large lobby on those maps shows more nations than the named list. Japan has no overflow, so a lobby of any size shows exactly the twelve named nations and nothing more. The practical consequence is that the player-to-island ratio on Japan is fixed by the twelve named nations and the number of humans in the lobby, and the engine spreads the humans across those twelve. That is why the community reports that Japan lobbies can feel both crowded and empty at the same time: the middle clusters get the humans because they are the dense part of the chain, and the two ends often get none, so a player who spawns on the middle is surrounded and a player who spawns on Okinawa is alone. The nation layer is not a list of twelve regions, it is a diagonal chain with a dense middle and two sparse ends, and the decision framework is built around the middle.
Decision framework: name the cluster before you name the island
The decision framework on Japan is the anchor cluster rule, and it is the same shape as the anchor rule on a peninsula map, except the anchor is a cluster of islands instead of a named nation on a coast. The rule has four steps, and the order matters. The first step is to read the chain before the countdown ends, which means looking at where you will spawn and which of the three parts of the chain, the southwest tail, the middle, or the northeast cap, your spawn falls into. The second step is to name the anchor cluster, the one part of the chain you are going to hold, and to commit to it. The third step is to name the two neighbour clusters, the parts of the chain directly beside the anchor that you will contest in the midgame. The fourth step is to commit to the navy that reaches them, because on a board this wet the navy is the only way the anchor cluster reaches its neighbours.
The assumption behind the framework is that you are not the strongest player on the middle, because if you are, the framework is the same except the neighbour clusters are a bonus instead of a fight, and the anchor is the same either way. The anchor cluster is usually one of the dense middle clusters, the Kansai cluster or the Kanto cluster, because those are the clusters with the most named nations packed together and the most income per engagement. The two neighbour clusters are the ones directly beside the anchor on the diagonal: for an anchor on Kanto the neighbours are Chubu to the southwest and Tohoku to the northeast, for an anchor on Kansai the neighbours are Chugoku to the southwest and Chubu to the northeast. The navy that reaches them is the screen you keep between the anchor and the rest of the chain, and it is the unit that turns the anchor from a rich island into a held region.
The failure this framework exists to prevent is the player who commits to an island and then spreads along the whole chain, because on a board this wet that spread is the loss. The spread player takes one island, sees the next one, takes it, and by the third island the navy that was meant to hold the first one is gone, so the first island is exposed and the whole chain is open to the player who held the middle and waited. The anchor cluster rule is the only shape that keeps the chain defensible, because it names the one cluster you hold and the two you contest, and it keeps the navy on the anchor instead of spreading it thin along the diagonal. The framework is not a prediction of which island will be richest, it is a rule that keeps the player who holds the middle from losing it to the player who was trying to take the whole chain at once, and the middle is the part of the map that decides the match.
Scenario one: a mid-sized FFA with low contact
Scenario one is the mid-sized FFA, which is the mode the community reports most often and the mode where Japan’s water works the way the framework assumes. The numbers in this scenario are the lobby size and the player spread. A typical mid-sized FFA on Japan carries four to six humans, and the engine spreads them across the twelve named nations, so the middle clusters get most of them and the two ends get few or none. The community’s own reports match this: a November 2025 player who finally won Japan after losing roughly fifteen times described spawning near Tokyo, which is one of the dense middle clusters, and a separate October 2025 annotated game reported the player sharing the map with only four other humans, all in the north, with two of them quitting within the first minute. The reading of those reports is that the middle is crowded and the ends are empty, and the scenario is built on that spread.
The play in this scenario is the anchor cluster rule applied to the middle. The player who spawns on a dense middle cluster, Kanto or Kansai, anchors it, names the two neighbour clusters, and builds the navy that reaches them. The assumption is that the player is not the strongest human on the middle, because the middle has the most humans, but the player holds the cluster and contests the two neighbours while the humans on the other clusters fight each other. The income on the middle is the income of the densest part of the chain, and the defence is the navy that screens the two crossings to the neighbours. The failure this scenario exists to prevent is the human who spreads from the middle toward the ends, because the ends are empty and the crossing to them is long, and the human who spreads is the human who is alone on Okinawa with no navy behind them. The mid-sized FFA is the mode where the framework is cleanest, because the player spread is the spread the framework assumes and the middle is the part of the chain that decides the match. The second economy of this scenario is the navy itself, because the navy is the unit that turns the anchor cluster from a rich island into a held region, and the player who builds the navy first is the player who controls the two crossings to the neighbours, which means the player who builds the navy first is the player who can choose when the midgame opens and the player who does not is the player who reacts. The countdown in this scenario is the same countdown as on any map, but the countdown on Japan is the countdown to the first crossing, because the first crossing is the first time the two clusters on the chain become one, and the player who wins the first crossing wins the midgame, which is why the player who anchors the middle and builds the navy is the player who should win this scenario, and the player who anchors the middle and does not build the navy is the player who holds the income and loses the crossing.
Scenario two: the north-south split along the diagonal
Scenario two is the split, which is the mode where Japan’s diagonal becomes the game. The map has no team spawn line the way Korea does, so the split is not a fixed axis, it is the way the humans happen to land on the chain when the lobby fills. The numbers in this scenario are the two ends of the diagonal. A player who lands on the northeast cap, Hokkaido and Tohoku, is at one end of the chain with the dense middle more than six hundred tiles away and the southwest tail more than two thousand tiles away. A player who lands on the southwest tail, Okinawa, is at the other end with the dense middle more than a thousand tiles away and the northeast cap two thousand tiles away. The reading of those numbers is that the two ends are separated from each other by the whole middle of the chain, and the match is decided by which part of the chain holds the income and which part holds the navy.
The play in this scenario is the anchor cluster rule applied to the end you land on. The player on the northeast cap anchors Hokkaido or Tohoku, names the middle as the neighbour, and builds the navy that reaches it, knowing that the crossing is long and the middle is dense. The player on the southwest tail anchors Okinawa, names the middle as the neighbour, and builds the navy that reaches it, knowing that the crossing is even longer and the middle is the same dense cluster either way. The assumption is that the player is not the strongest human on the middle, because the middle is where the humans are, but the player holds the end and contests the middle while the humans on the middle fight each other. The failure this scenario exists to prevent is the end player who tries to reach the other end without holding the middle, because the two ends are separated by the whole chain and the crossing that skips the middle is the crossing that loses. The second economy of this scenario is the screen, because the navy that screens the end is the unit that stops the middle from rolling over the end, and the player who builds the screen holds the end, and the player who does not build the screen holds the corner and loses the chain, which is why the player who anchors the end and builds the screen is the player who should win this scenario. The north-south split is the mode where the diagonal is the axis, and the player who reads the split knows which part of the chain the match is decided on, which is the middle, and the player who does not read the split is the player who treats the long diagonal as a road and marches it.
Failure modes and opponent counterplay
The failure modes on Japan are three, and they are all the same failure with a different name, the failure of committing to an island before you commit to a cluster. The first is the island commitment, which is the player who picks an island because it looks rich and takes it, and then reaches for the next one, and the counter is the anchor cluster rule, which is to hold the one cluster and contest the two neighbours instead of spreading along the diagonal. The reason the island commitment is so common is that the islands on the middle look like the richest part of the chain and the player wants the income, but the income only exists if you still hold the cluster, and reaching for the next island gives the first one away to the neighbour while you own the weaker islands. The second is the end neglect, which is the player on the middle who treats the two ends as irrelevant because they are far, when in fact they are the separate second front and the first prize of the player who reads the diagonal, and the counter is the navy rule, which is to keep the screen between the middle and the ends and plan the crossing before the countdown ends. The ends are easy to neglect because they are the sparse part of the chain, one named nation each against the seven of the middle, and the crossing looks expensive, but the second front is the prize that wins the match when both players hold the middle.
The third failure mode is the overextension, which is the player who holds the middle and reaches for both ends at the same time, and the counter is the two-neighbour rule, which is to keep the two crossings safe before the second front is open. The overextension is the failure that looks most like a win in the lobby, because the player who holds the middle and the ends controls the whole chain, but it is the most fragile shape on a diagonal of islands, because the two ends are the two sides the enemy can hit while you are busy on the middle. The opponent counterplay that the three failures feed is the axis grab, which is the player who takes the contested axis before you do. On Japan the axis is the middle of the diagonal, and the axis grab is the player who holds the dense middle cluster first, because the middle is the densest part of the chain and the player who owns it owns the income and the two crossings. The counter to the axis grab is the same framework run one minute earlier, which is to name the anchor cluster and the two neighbours in the lobby so the middle is already on your plan when the countdown ends. The three failures and the axis grab are the whole of Japan’s tactical content, and the player who can run the framework is the player who wins the chain.
Mode and map adjustments
The mode you are playing changes the Japan read in a small number of ways, and the map itself changes the mode reading in a few more. The first mode adjustment is the FFA read, which is the fact that Japan has no team spawn line and plays FFA-only, and the decision framework changes from which side you pick to which cluster you hold. In a larger FFA lobby the middle has more humans per named nation, so the middle is more crowded and the spread failure is more likely; in a smaller FFA lobby the middle has fewer humans per named nation, so the middle is less crowded and the anchor cluster rule is cleaner. The FFA framework is the same concentration logic as any FFA map, applied to the dense middle of the chain instead of the middle of a continent.
The second mode adjustment is the v0.35 national AI, which now retaliates harder against the player who pulls ahead, follows up on beachheads, and targets nuclear strikes more intelligently. On Japan the national AI change means the sparse ends are a more contested prize, because the AI on the end side follows up on a landing and the AI on the middle side retaliates harder if you pull ahead, so the ends are the axis where the v0.35 AI is most active. The third mode adjustment is the nuclear territory annexation rule, which lets you seize a piece of territory that a nuke has severed from its owner’s main body. On Japan the annexation rule means a nuke that severs an island from the rest of the chain makes that island a separate piece you can annex, which changes how you play the crossing and makes the middle a nuclear target as well as a land prize.
The fourth mode adjustment is the Doomsday Clock, if it is active. The Doomsday reading on Japan is the same as on any map, which is that the under side is fighting to survive the wave, but the Japan reading is that the under side is usually the player on the end, because the player on the end is the player with the smallest land share. The Doomsday reading is the same as the concentration reading, which is that the middle player is the player who can keep expanding to the last economy, so the end player has to force the middle player to spend units on the screen. The map adjustment is the same as the mode adjustment, because the diagonal of islands is the mode on this chain, and the mode changes the reading of the FFA spread, the national AI, the annexation rule, and the Doomsday Clock. The player who can read both the mode and the map is the player who plays Japan correctly, and the chain is the one that decides the match.
What to take into your next match
The single takeaway from Japan is that the board is mostly water and the decision is the cluster, and the cluster is decided by the anchor. The map is two thousand five hundred by two thousand five hundred with four hundred seventy-eight thousand eight hundred ninety-four land tiles and twelve named nations strung along a diagonal from Okinawa in the southwest to Hokkaido in the northeast, and the match is decided by which of the three parts of the chain you commit to before the countdown ends. The decision framework is the tool, which is to read the chain, name the anchor cluster, name the two neighbour clusters, and commit to the navy that reaches them, and the scenarios are the two ways the match plays out, the mid-sized FFA with low contact and the north-south split along the diagonal. The failure modes are the three ways the match is lost, the island commitment, the end neglect, and the overextension, and the counterplay is the one way the opponent wins, the axis grab on the dense middle. The mode and map adjustments are the last piece, which is that the mode changes how the FFA spread reads and how the national AI, the annexation rule, and the Doomsday Clock read, and the map changes where the two ends and the middle of the chain are.
For the broader systems this opening feeds into, the map strategy guide covers connected land and water networks on any board, the island defense guide covers how to screen the island crossing and when a disconnected sea route means you should fall back to land, the doomsday clock guide covers the rising land-mass threshold that punishes the player on the end, the cross-water commitment guide covers the cost of the crossing from the middle to the ends, and the ffa midgame strategy guide covers how to hold the middle when the other players are fighting each other. Bring those into the same decision and the Japan opening stops being a guess about which island looks rich and becomes a plan about which cluster, which two neighbours, and which navy you are committing to before the countdown ends, which is the only time the whole thing is still in your hands. The chain is long enough that a wrong cluster is recoverable for a short while, but the middle makes the correction a crossing, and crossings cost time and a unit you may not be able to afford if you have already burned your early game on a bad start, which is why the players who win on this map are usually the ones who named the anchor cluster and the two neighbours and committed to the navy the anchor sat on, rather than the ones who picked the familiar island by instinct and then had to improvise the crossing.
Related content
Use OpenFront v34.3 costs, troop growth, route payback, and stop signals to choose City, Port, Factory, defense, or a liquid reserve without copying a fixed script.
- OpenFront AFK Teammate Takeover: Absorb a Disconnected Ally for Zero Troop Loss
A Team-mode decision guide for what a teammate's disconnect does to your win/loss position, when absorbing their land is free, when it is a trap, and what the 30-second mark and the ranked 2v2 rules actually change.
Sep 23, 2026
- How Nations Aim Their Nukes: Smarter Targeting, No Wasted Blasts
A strategy guide for the upcoming AI Nation nuke targeting change: Nations now compute how much of a blast hits enemy land before firing (atom 25%, hydrogen 40% minimums), they skip a spot where another player's nuke is already landing, and they never nuke a target that would hit friendly land. What changes in your decision, the coverage gate, the anti-double-nuke rule, the failure mode and the mode/map adjustments.
Oct 8, 2026
- Alliance-Break Timing: When 30 Seconds Is Worth the Trade
Decide whether to break a live alliance now, wait for it to expire, or renew it, using the 30-second traitor window, the 0.5 defense and 0.8 speed debuffs, and the -100/-40 relation drops in OpenFront v0.34.
Sep 30, 2026