GUIDES
Strait of Gibraltar Openings: Choose a Continent, a Gate, and the Crossing
Pick your Gibraltar opening by usable land on each continent, the first land gate, the strait crossing, and a second route before the countdown closes your options.
The Strait of Gibraltar is the only OpenFront map that puts two full continents, Europe and Africa, on one board with a single narrow strait between them. That changes the opening question from “which corner is safe?” to “which continent do I take, which gate keeps my land connected, and when do I commit to the crossing?” You place freely during the spawn countdown, so the goal is not to memorize a nation name but to read four observable inputs before the timer ends: how much usable land your side offers, how many human markers are already claiming it, whether the strait or a port gives you a real second route, and whether at least one land gate into the rest of your continent stays open. Choose the least-contested side that clears all four checks, and treat the strait crossing as a planned second exit rather than an emergency. Getting this wrong costs you the opening, because the two continents are otherwise sealed off from each other by water and a wrong continent only becomes fixable through a crossing you have to pay for with a unit and time.
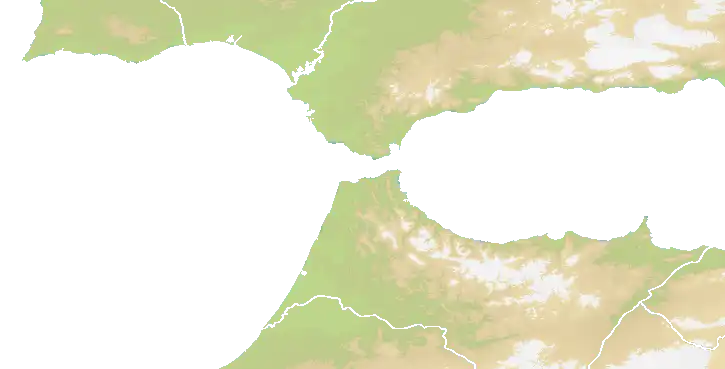
Map identity and version boundary
The map ships in the current build at tag v0.34.20, the latest formal non-TEST release, published 2026-09-26. Its manifest records a full-resolution board of 2,900 by 1,476 tiles with 1,957,694 land tiles, and the map4x gameplay asset used for the geometry analysis below, which is the same scale the game actually plays at. The official marker list places sixteen geographic labels across the two continents: Portugal, Huelva, Seville, Cadiz, Malaga, Granada, and Almeria on the Iberian side; Gibraltar on the western tip of that peninsula; and Algeria, Ceuta, Tangier, Rif, Oujda, Melilla, plus the Shilha and Rabat areas on the African side. These are geographic landmarks, not fixed spawn points, and players select their own coordinate during the countdown, so the guide uses them as stable reference points rather than as tier-ranked start cells.
The rotation metadata in the generated map configuration records multiplayerFrequency: 5, ffaFrequency: -1, and teamFrequency: 10. The multiplayerFrequency value is the weight that governs where the map appears in the normal public pool, so Gibraltar is a regular rotation map rather than a hidden custom-lobby asset; a player does not need a special lobby to see it, and it will surface on an ordinary public match on its normal cadence. The -1 on ffaFrequency is the same fallback signal the project uses for other two-mode maps: it does not describe a distinct standalone FFA weight, so this guide frames the opening around public rotation and team play rather than inventing an FFA-only probability that the data does not support. The teamFrequency: 10 is notably the larger of the two rotation weights, which means the map is a frequent Team-mode board and the two-continent geometry is something the designers expect players to plan around with allies present. That single number changes the framing of the whole guide, because a map that shows up twice as often in Team play as in generic public play is a map where the “split the continents with an ally” question is a real, recurring decision, not an edge case. That framing also explains why the guide never lists a nation as the “best” spawn, because the same marker is the strongest position in one lobby and a trap in another, and the difference is the marker density you can read during the countdown. The version boundary is therefore v0.34.20: every land count, rotation weight, and landmark position cited here was read from the tagged manifest, the tagged generated map configuration, and the tagged shipped terrain binary at that tag, so a player reading this on the current build is reading the same facts the game currently ships, and a future rebalance that changes the strait width or the arena sizes is the only event that would require re-running the geometry read.
How the geometry actually reads
The terrain binary is where the real decision comes from. Reading the shipped map4x asset with the project’s terrain encoding, the board resolves into fourteen connected playable-land components, and two of them dominate everything else. The largest holds 695,693 playable pixels, about 35.5 percent of all playable land, and it is the Iberian arena: it contains the Cadiz, Malaga, Granada, Seville, and Almeria markers as well as the Gibraltar marker on the strait tip. The second largest holds 673,592 pixels, about 34.4 percent, and it is the African arena: it carries the Ceuta, Tangier, Rif, and Oujda markers. Between those two there is a cluster of much smaller components, the largest of which holds 171,781 playable pixels, with 128,227 and 125,334 pixels on either side of it, which is where Portugal, the western Iberian coast, and the Rabat and Shilha pockets sit. The strait itself is overwhelmingly water: the narrow channel between the two big land masses is a crossing corridor, not a third continent, and about 80 percent of the whole board is ocean.
The single most important geometric fact is the position of the Gibraltar marker. In the local distance-to-ocean measurement it sits one step from open water, and its land share in the sampled radius is only 19.9 percent, meaning the Gibraltar marker sits almost entirely on the sea side of the map. By contrast, markers such as Seville sit about 64 steps inland, Huelva about 106 steps inland, and Cadiz about 246 steps inland from open water. So the same “strait tip” idea means two different things depending on which side of it you take: taking Gibraltar on the Iberian side hands you immediate sea but very little surrounding land, while taking the nearby African coast (Ceuta and Tangier) hands you immediate sea plus access into the large African component. A player who reads only the thumbnail sees one tight pinch point; a player who reads the binary sees two large arenas, several small coastal pockets, and one water corridor that decides whether those arenas talk to each other at all. The practical read is that the strait is not a place you spawn on, it is a place you cross, and the two big land masses are where you actually want to be. The 80 percent water figure also has a gameplay consequence: most of the board’s area is unusable, so the effective arena is smaller than the tile count suggests, and the two continental masses are concentrated around their coasts, which means the “edge” of a continent is usually only a short walk from open water and therefore from a viable port. That proximity is what makes the second-route decision so central: because usable land hugs the coast, almost every reasonable spawn already has water close enough to justify a port, and the real question is whether you will use that water to cross or to defend.
Decision framework before the countdown closes
Turn the opening into a short checklist you run while other markers are still dropping, instead of reaching for the most famous spot by name. Room: estimate the usable land on each side from the component sizes. The Iberian arena is the largest single block, so it offers the most continuous room and the most future land contact, while the African arena is slightly smaller but still very large and is backed by the smaller western pockets that can act as relief valves when the main component gets crowded. A low-player public match rewards the broad continuous side because there is less competition for the few gates; a crowded match rewards whichever side still has an open gate and room to spread.
Indicators: count the human markers already on your intended side. The recurring community lesson is that the visually best sector becomes the worst the moment several players stack it, so a large component is only as good as the number of markers left to fight over its gates. On a two-continent map this is sharper than usual, because the marker density you see on your side tells you almost nothing about the other side, and the other side is your fallback. Navigation: decide whether your opening keeps a real water route. On this map that means either a port on your own coast or a strait crossing, and it is the variable that separates a normal economic start from a trapped start, because the two continents are otherwise sealed off from each other by water and a player with no port and no crossing plan is on a one-exit island. Gates: confirm at least one land expansion gate plus one fallback. The fallback on this map is unusually concrete: it is the strait itself, or a port that lets a transport reach the other continent.
The default call is to choose the least-contested side that clears all four checks. If your preferred side fills with markers before the timer ends, move. If your chosen pocket has only one land gate into the rest of the continent, secure that gate before you spend on infrastructure, because a single-gate pocket is exactly the shape that one early annexation can delete. If that gate is already contested, a minimal crossing foothold is justified only when losing all expansion room is otherwise imminent, and a slow transport is not the same thing as normal early growth. The framework is deliberately conditional: it ranks inputs, it does not hand you a single “best” marker to press, because the same continent is the right answer in a quiet lobby and the wrong answer in a crowded one, and the difference between those two lobbies is usually just a handful of markers you can read during the countdown.
Scenario A: the crowded Iberian south
Scenario A is the public rotation match with many players and the Iberian south coast already stacking. You watch Cadiz, Malaga, and the Gibraltar tip all light up with human markers during the countdown, and the single largest land arena on the map is the one everyone is fighting over. This is the direct analogue of the crowded-corner failure that shows up repeatedly in community discussion: the best-looking sector is exactly the sector everyone else also reads as best, so its gates are already in play before the match starts, and the bot chain that would normally be your first annexation target is being consumed by other players’ transports and early expansions. Your decision is not to join that stack at the edge, even though the arena is the largest on the map and therefore the most tempting.
You have two clean responses. First, move across the strait to the African side, where the large component is real but less saturated, take a coastal pocket near Ceuta or Tangier, and open into the African arena while it is still empty; your immediate sea access then works in your favor because it is the route back across if the Iberian side opens up later, and you have quietly turned the crossing from a threat into an asset. Second, if you stay Iberian, you must give up the saturated south and take the western or northern Iberian pockets, the smaller components around Portugal and the northwest coast, accepting less raw room in exchange for fewer markers and a calmer first expansion that lets you build a real economy without fighting over every bot. Either way the rule is the same: a large continuous arena is not a free asset when its gates are already contested, and the moment you see your intended gate being taken, the correct move is to re-evaluate the continent, not to commit to the exposed shoreline and hope for a later breakout. The stop signals are concrete: three or more markers inside your intended pocket, a rival already annexing the bot chain that is your only land route, or no clear first expansion target. If any of those is true, the opening has already closed and staying costs you the early game, which on a two-continent map means you lose both the local fight and the option to cross. The deeper point is that on this map a bad continent choice is not just a worse start, it is a different strategic problem, because the continent you are stuck on determines whether your second route is open or blocked, and the crowd that took the south has already decided that the strait will be contested, which is exactly the condition under which a crowded-side player wants to be able to escape across the water.
Scenario B: the quiet African opening
Scenario B is the public rotation match with fewer players and the African side still open. You take a coastal pocket near Ceuta or Tangier, keep immediate sea access to the strait, and open inland into the large African component while the Iberian arena is the side most players instinctively reach for, because the familiar European names make that side feel like the “home” arena. The payoff of this shape is the contrast between the two arenas. You are not on the single largest block, so you do not inherit the most future land contact, but you are also not in the stack that forms on the famous southern European coast, and the African component is large enough that you have room to grow into a real economy rather than a thin coastal strip, which is the difference between a start you can develop and a start you are forced to fight out of.
The strait then becomes your second route: with a port on the African coast you can send a transport across to the Iberian side when the map opens up enough to be worth crossing, and because the water corridor is the only connection between the continents, a crossing that is well-timed reaches a side that is still underdeveloped, which is exactly the moment a crossing is cheapest and most valuable. The discipline here is timing. The African opening should clear land first and add a port once neighboring ports make the crossing economically useful, not launch a large transport immediately and delay inland growth for a crossing that is not yet worth it. A port that you build too early and cross with too eagerly is a unit you lose for no payoff, and the African arena is large enough that you do not need the crossing to be safe. The stop signals are also concrete: the African side suddenly fills and your pocket loses its second exit, a rival on the Iberian side builds a warship screen that makes the crossing unsafe, or your own port is exposed to a fast crossing attack. In that last case the port is a liability, not an asset, and you fall back to a land-only opening that treats the strait as a threat to defend rather than a route to use. The quiet African start is therefore a conditional strong play: it is strong while the continent is open and the crossing is safe, and it is a trap the moment those two conditions stop being true, so the skill is reading the crossing window and committing only inside it.
Failure modes and opponent counterplay
The openings on this map fail in specific, avoidable ways, and recognizing them in your own play is as important as choosing the right side. The most common is the famous-spot stack: you take Gibraltar or the Iberian south because it looks central and European, then discover the gates are already contested and you have no clean first expansion, so your “good” position is actually the most contested position on the board. The second is the sea-edge trap, where you spawn directly on the strait shoreline for immediate water and sacrifice all inland room, which is exactly what the 19.9 percent land share at the Gibraltar marker measures: that marker buys sea and gives away almost no land, so a player who treats the strait tip as their home base is building on a cliff with no shelf behind them. The third is the single-gate pocket, where you take a small coastal component without identifying its only land gate into the larger arena, so one early annexation cuts you off and turns your pocket into a dead end you can only leave by water. The fourth is the premature crossing, where you commit a large transport to the strait before your own economy can afford it, leaving you with neither a solid base on your continent nor a safe foothold on the other, which is the worst of both worlds. The fifth is the exposed port, where you build your crossing port on an open shoreline with no defensive cover, so it becomes a target the moment a rival fields a warship.
Opponents have clean counterplay to each of these. Against a crowded Iberian side, a rival can simply take the African continent and use your overcommitment against you, or race the same gate you want and annex the bot chain that would have been your escape. Against a quiet African opening, a rival can screen the strait with a warship so your crossing is unsafe, annex the bot chain that is your land route to the interior, or approach you across the water before your port is defended, turning your second route into the enemy’s invasion path. The correction pattern is the same in every case: keep a second route open, do not build permanent infrastructure on the first exposed shoreline, and re-evaluate the continent the moment a gate stops being yours. The map is unforgiving of players who pick a side and stop reading it, because the strait guarantees that whichever side you choose, the other side is always a reachable threat or a reachable escape, and a player who cannot tell which one it is at any given moment is playing blind on a map where the whole point is the two-sided relationship.
Mode and map adjustments
The same opening reads differently across modes and player counts, and adjusting is part of the decision rather than an afterthought. In a low-player public match the broad continuous side is worth more, because there are fewer markers to contest the gates and the large arena becomes a quiet economic base; here the Iberian arena is the natural pick unless its south is already taken, and the crossing is a bonus you can take later rather than a necessity you need on second. In a crowded public match the value flips toward the side that still has an open gate and a real second exit, which usually means the African continent or the western Iberian pockets, and the strait crossing becomes more valuable precisely because the direct land path on the crowded side is clogged, so the crossing stops being an optional bonus and becomes the only clean way to reach fresh room.
In Team mode the geometry works for the teams instead of against individual players: an ally who takes the second continent is a deliberate asset, because they can hold the other side, coordinate a crossing, and give your team a guaranteed second route that a lone player could not secure alone. The teamFrequency: 10 weight means this map shows up often enough in Team play that you should plan the continent split explicitly rather than leaving it to the countdown. Two team shapes follow. The balanced split has both teams holding one continent each, which turns the strait into a contested crossing corridor and makes a warship the most contested unit on the board, because whoever controls the crossing controls the initiative and can project force across the water at will. The stacked shape has both of your players on one continent, which gives you a huge local force but abandons the other continent to the enemy and makes the crossing a one-way invasion you must time carefully, because the abandoned side is exactly where the enemy will build the warship that eventually comes for you. On the smaller map4x board the strait crossing is shorter and the two arenas are easier to reach, so early crossings become more viable and the value of holding an open port rises. The practical rule across all of this is to name your second route before the countdown ends: in public play it is the strait or a port, and in team play it is the continent your ally is holding. A player who cannot name the second route is playing a single-exit opening on a map where the single exit is the thing the enemy will always try to take.
| Side | Playable land | Markers on the arena | Immediate sea | Second route | Best when |
|---|---|---|---|---|---|
| Iberian arena | 695,693 px (~35.5%) | Cadiz, Malaga, Granada, Seville, Almeria, Gibraltar | Gibraltar tip (19.9% land) | Port + strait crossing | Quiet lobby, west/north gates open |
| African arena | 673,592 px (~34.4%) | Ceuta, Tangier, Rif, Oujda | Ceuta, Tangier coast | Port + strait crossing | Iberian south crowded, crossing safe |
| Small western pockets | 125k–171k px | Portugal, Rabat, Shilha areas | West/northwest coast | Land gate into a larger arena | Crowded match, need a calmer start |
What to take into your next match
The Strait of Gibraltar asks you to make a continent-level decision in the first seconds of a match, and the difference between a good start and a trapped start is almost always the same four inputs: room, indicators, navigation, and gates. Run the checklist while the markers are still dropping, not after, because the countdown is the only window where the continent choice is still yours to make and the moment it ends your fallback routes narrow. If the side you want is filling, move before the timer ends, because a marker that lands on your gate during the countdown is a gate you will spend the early game fighting over instead of building with. If your pocket has one land gate, secure it before you spend on buildings, and if the only way out is the strait, treat that crossing as a planned second exit with a port behind it rather than a desperate boat, because a port you build on purpose reaches across on your schedule and a boat you launch in panic reaches across on the enemy’s terms.
The map is small enough that a wrong continent is recoverable for a short while, but the strait makes the correction a crossing, and crossings cost time and a unit that you may not be able to afford if you have already burned your early game on a bad start. In practice the recovery window is short: the first few minutes of a match decide which continents are still empty, and once both are claimed the strait becomes the only remaining variable, which is why the players who win on this map are usually the ones who read the countdown carefully and committed to a continent with a named second route, rather than the ones who picked the familiar European side by instinct and then had to improvise the crossing. For the broader systems this opening feeds into, the transport landing guide covers the crossing itself and when a transport is a tool rather than a gamble, the general map strategy guide covers connected land and water networks on any board, the threat assessment guide covers reading an opponent who is about to cross at you, and the team spawn formation guide covers how to split the two continents with an ally in Team mode. Bring those into the same decision and the Gibraltar opening stops being a guess about which flag looks central and becomes a plan about which continent, which gate, and which crossing you are committing to before the countdown ends, which is the only time the whole thing is still in your hands.
Related content
Use OpenFront v34.3 costs, troop growth, route payback, and stop signals to choose City, Port, Factory, defense, or a liquid reserve without copying a fixed script.
- OpenFront AFK Teammate Takeover: Absorb a Disconnected Ally for Zero Troop Loss
A Team-mode decision guide for what a teammate's disconnect does to your win/loss position, when absorbing their land is free, when it is a trap, and what the 30-second mark and the ranked 2v2 rules actually change.
Sep 23, 2026
- Alliance-Break Timing: When 30 Seconds Is Worth the Trade
Decide whether to break a live alliance now, wait for it to expire, or renew it, using the 30-second traitor window, the 0.5 defense and 0.8 speed debuffs, and the -100/-40 relation drops in OpenFront v0.34.
Sep 30, 2026
- OpenFront Annexation and Enclosure: Close Pockets Without Overextending
Learn how to take small footholds, close an enemy pocket, and keep a second route after the capture instead of turning a lead into a fragile border.
Sep 4, 2026